Desert Bus for Hope 6

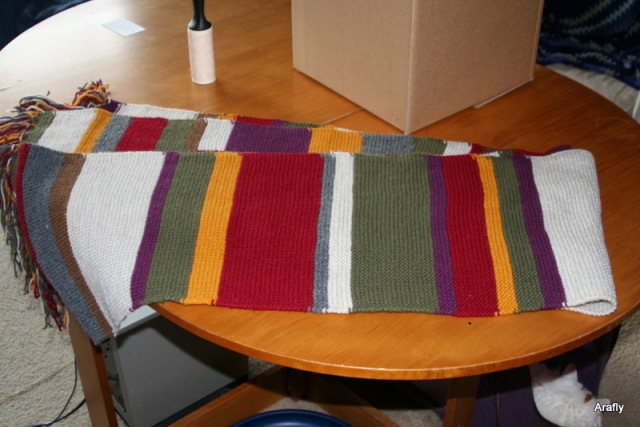
Desert Bus 6 is right around the corner! I can’t believe it has already been a year since my last scarf brought in over $3,000 for Child’s Play Charity!

I am keeping the expectations low this year, just like last year. I have three items in this year’s Bus experience:

1) Mini Doctor Who Scarf – Give-Away Item

2) The Doctor Who Scarf-purse – Auction Item

3) Full-sized Season 15 Scarf – Auction Item

Please tune in starting November 16th at Desertbus.org. You may find something that will make a unique Christmas present (perhaps even a collectible item) for that nerdy friend, plus you will be contributing to a very worthy cause, Child’s Play Charity. Child’s Play provides books and entertainment supplies for children’s hospitals around the world.

The team at LoadingReadyRun works extremely hard each year (for 6 years running) to put this event together. They work around the clock to take donations for suggestions for dares, requests for performances, do pledge give-away events and run auctions – all while playing a marathon run of the tedious and boring video game, Desert Bus! Last year there were live Skype phone-ins from people like Wil Wheaton, Felicia Day, and Peter Sagal.

I’m a Desert Bus Crafter and I approve of this message!

Beginning With a Swatch

After yarn shopping, my friend decided on Stitch Nation’s Bamboo Ewe in a shade of gray.

The original sweater is most likely in something like Cascade 220 Super-wash, best we can tell. While 100% wool is springy when knit up, adding the bamboo causes the yarn to relax a little after it’s been washed.

To begin, I knit up two gauge swatches in the sweater’s pattern, on two sizes that I figured already were close to accurate (US 7 & 8). Then I washed them both in cold water & Woolite.

Here are the before and after pictures to show how both swatches relaxed almost an inch after washing.

Size 8 is on the left, size 7 on the right. They are really close to being the same size.

Size 8 on the left and 7 on the right again.

Either way, it looks like size 8 is the closest to the original sweater, which I had already guessed (always good to be certain before you start).


The Sweater Challenge

Been a while since my last update. Apparently grad school + work = too busy to do the things you want.

A few weeks ago, a friend of mine proposed that I take a look at a much-loved sweater of hers to see how I felt about trying to recreate it. At this stage in my knitting, I feel confident enough to take a shot at reverse-engineering a shirt, so we’re going to give it a go.

I apologize for the crappy photos. I need to change the lens on my camera, because this one does not like to get too close.

The original sweater.

Overall, the shirt is knit flat in pieces and seamed together. A basic knit 1, purl 2 ribbing for the body of the shirt. It gets interesting where the sleeves are joined, however, as stitches are added gradually for the process of the braided cable. I’ve figured out that 3 stitches are added on each side, over 3 rows, before the braid starts.

Mattress stitch, seaming the front and back together.

Seaming on the inside of the sleeves. As you can see, the seam is perfectly lining up the rows.

I think the hardest part is going to be figuring out the sleeve measurements. They are beautifully and flawlessly attached around the shoulders, so I’ll need to get the decreases just right.

Looking at the shoulder from the side (sorry, it’s blurry).

Last but not least, the neck line is first folded over and seamed so that the stitches make a horizontal line around the inside of the neck. Then, a separate braided band is stitched around the outside.

Note the line of stitches around the inside seam.

The cowl neck.

That’s the break-down. I’ll keep you posted as soon as I get started. This is going to be an awesome learning experience and I can’t wait to begin!

The Purple Purse

The purse is mostly finished and I can say it was definitely another learning experience.

Not the greatest purse.

I’ve already taken it for a couple of test-drives and it serves the purpose I made it for, so I would call it a success. It holds my wallet, keys, cellphone and is just deep enough for pens (or certain feminine products).

I ended up making the strap a little too long. The problem with measuring a strap is that you have to take into account the fact that it will stretch depending on how much you put in the purse.  At this stage of knitting, I should have known that, which is why I shouldn’t knit when I’m tired! It should be pretty simple to fix. All I need to do is fold it over and take it in either at the center or on each side.

I did not end up working the beaded part onto the front because the beads that I bought were too small. I’m working with some other ideas, like making a beaded embellishment with a thinner yarn and sewing it on or sewing on a patch.

This is not a pattern, but more of a general idea of what I did to make it:

Worked in stockinette stitch.

  • Cast 30 stitches on size 6 needles (enough to equal 5 inches) with Caron Country yarn. Worked 48 rows (enough to equal 6 inches).
  • Switched and picked up knitting with 2-ply fine acrylic yarn and size 4 needles, adding 1 stitch to each side to make up for the gauge difference. Worked 45 rows. I used the thinner yarn for the center because I didn’t want the purse to be super thick.
  • On the 46th row, I worked 3 stitches, bound off 26, worked 3 (for zipper hole).
  • Row 47, work 3, cast on 26, work 3. Then worked another 64 rows.
  • Switched to size 6 again and picked up to knit with the Caron Country yarn again for 48 rows. For this back section, I added 2 stitches to each side for it to be wider when I seamed the front and the back. That should equal 36 stitches (because of the 2 already added when working the thinner yarn).
  • On the 48th row, bound off 3 stitches on each side (back to 30 total).
  • I worked the next 48 rows with a 3 stitch garter-stitch border on each side, plus 6 rows of garter stitch at the end. I realized the closing flap was not going to lay flat, so I picked up with the thin yarn again and worked enough rows to have a lining for the inside of the flap, then bound off.
  • Now for the finishing. I started by sewing the 4 inch zipper in place. Next, I accordion-folded the purse and pinned the seams. First, I seamed the bottom of the middle pocket, then I mattress-stitched the sides of the middle pocket.

The zipper pocket.

  • I seamed the middle pocket to the inside/back of the purse by seaming the sides of the middle pocket to a vertical row of purl bumps on each side (hopefully that makes sense).

This is how the bottom ended up looking. I suppose it would be better to use the same color yarn or seam it differently.

  • Last, I mattress-stitched the front and back sides of the purse and seamed the lining onto the closing flap.

Side view.

  • I added snaps to keep the front closed, then made a handle out of the thinner yarn (I ran out of the Caron Country) and seamed it to the inner sides of the purse. My handle was about 17 stitches across worked in ribbing.

Inside flap and snaps.

I know it’s not the greatest description, but I’m not exactly thrilled with it, either. Feel free to ask if you have any questions.

Another purse endeavour

Before the Doctor Who purse, I had already been mulling over a design for a purse for myself. Not being a very girly-girl in general, I lack… well… any purses in my house. Back in college I quickly found that I would forget my purse under cafeteria tables or in the library and decided I shouldn’t be allowed to carry one. Now that I am not so forgetful and like to wear skirts, I realized I should have something small to hold my things when I have no pockets (not to mention they don’t really make girl-pockets big enough to hold anything).

I will eventually make another Scarf Purse for me (the first one being bound for Desert Bus), but this week I decided to work on a simple, small, purple purse. I’m not claiming this pattern to be particularly original, since the design is real simple. Any beginning knitter who knows stockinette stitch and seaming could make one.

I figured I could make a small strip, like a scarf, and fold it over so that it had front, inner pocket, back, and closing flap – all in one piece. Next, you can either seam up all the edges and make a handle, or knit a long, inch-wide strip to seam to the sides and continue as a handle. At this point, I am almost finished with the body and haven’t decided on the handle design yet. I used a nice worsted-weight yarn, switching to a thinner yarn for the inside pocket so that the purse would not end up being super thick, then back to the worsted.

Photos to come, but here’s the basic idea in a poorly-drawn Paint sketch:

Behold, the amazingly complex purse design!

Once done, it will be just large enough to hold a cell phone, wallet, keys, etc, with a (most likely frivolous) zipper pocket in the middle. I’m also going to try my hand at beading and work the VNV Nation logo into the closing flap.

The 4th Doctor’s Scarf made into a handbag

First, I would like to state that I’ve already proved I cannot consistently update a blog. Hopefully I can fix that.

In this post, I would like to take you through the creation of a handbag to be donated to Desert Bus for Hope for this year’s Craft-A-Long. I made another huge scarf, like last year. Then, as I was dabbling in making a tiny scarf, I got it in my head that I was going to make a handbag. This was definitely a learning experience for me.

*Edit 8/21 – I have instructions below for the stripe pattern I used for the base/strap, but I forgot to add that for the rest of the body, you can take the original scarf pattern from the Doctor Who Scarf website and divide the rows into smaller sections. I think I did 1/4 scale rows (which would mean dividing all of the numbers presented on that pattern by half, since the numbers on that pattern are for garter stitch ribs, which come in pairs).

The 4th Doctor’s Scarf Purse:

The completed bag.

This project is knit flat in 4 pieces and seamed together using mattress stitch. Requires quite a bit of assembly/accessories. This is my first pattern ever, so bear with me if the instructions are vague. Feel free to use this pattern for gifts or charity with credit to me. Please do not re-post without my permission, sell purses made with the pattern for profit, etc.

Yarn used: Lion Brand Wool-Ease
Needle size: US 8 (5mm) or whatever size needed to match gauge, straight or circular
Gauge: 18 stitches x 24 rows = 4″ in stockinette stitch

Accessories needed:
One 4″ zipper
2-4 toggle buttons (size is up to you, depending on your i-cord)
Darning needle
Fabric for lining
Needle & thread for sewing on lining and zipper
DPN of any size for i-cords

Finished project should be approximately 10.5″ across (at base) by 8″ tall by 3″ wide (at side). My handle was 43″ long.

Abbreviations:
SKP – Slip one stitch knit-wise to the right needle, knit one, pass the slipped stitch over the knit one
k2tog – Knit two stitches together
kfb – Knit into the front of the stitch, (do not slip the stitch off the needle) then also knit into the back of the same stitch. If you are more comfortable with a different M1 method, feel free to substitute.
BO – Bind off
CO – Cast on

Front Piece:

CO 50 stitches
Knit in stockinette stitch (knit odd rows, purl even rows) using whatever stripe or plain pattern you desire, as follows:

  • Work 6 rows
  • Row 7 (this will be used for all Decrease Rows from here) k1, SKP, knit to 3 stitches before end, k2tog, k1
  • Work 5 rows
  • Decrease Row
  • Work 5 rows
  • Decrease Row
  • Work 5 rows
  • Decrease Row
  • Work 1 row
  • Row 27: k 12, BO 18, k 12
  • Row 28: purl 12, CO 18 using backward loop method, purl 12
  • Work 2 rows
  • Decrease Row
  • Work 5 rows
  • Decrease Row
  • Work 5 rows
  • Decrease Row
  • Work 3 rows
  • Next Decrease Row as follows: k1, SKP twice, knit to 5 to end, k2tog twice, k1
  • Work 5 rows, BO all stitches (52 total rows)

Back Piece:

  • CO 50 stitches
  • Work first 52 rows same as above for Front Piece
  • At row 53, work 18 rows in stockinette stitch.
  • For the following 24 rows, I worked in stockinette stitch, however, in hindsight, I feel it would have been better to work these rows in either garter stitch or with a garter stitch border on the outer edges, so that it will lay flat. I ended up having to knit another round of these 24 rows and seaming it to the inside of the flap, as you will see in the photos:
  • Work 6 rows
  • Decrease Row
  • Work 7 rows
  • Decrease Row
  • Work 5 rows
  • Decrease Row
  • Work 3 rows, BO all stitches (total 94 rows)

Base/Sides and Handle:
For this entire piece, I worked the Tiny Posh Season 12 pattern from The Witty Little Knitter’s site.

Or work in whatever pattern you choose.

  • CO 14 stitches
  • Work 12 rows
  • Row 13 (this will be your Increase Row): k1, kfb, knit to 2 to end, kfb, k1
  • Work 19 rows
  • Increase Row
  • Work 103 rows
  • Decrease Row
  • Work 19 rows
  • Decrease Row
  • Work 12 rows
  • Next Row (row 169): BO 2, knit to end
  • Row 170: BO 2, purl to end
  • Continue to work these 10 stitches in garter stitch until desired length. For me, it was until the end of the scarf pattern (a total of 43 inches of garter stitch). BO all stitches after desired length is achieved.

Pocket:

Knit a 5″ wide by 4″ tall square of your choosing.

Assembly:

Weave in all yarn tails and block your pieces, if desired.

Using mattress stitch (you can find tutorials online or in knitting books, usually, if you haven’t done this before), seam the front and back pieces to the base/sides with a long piece of yarn. I found it easier to use safety pins to line everything up and removed the pins as I went. This also helps to pace your stitching so that rows are lined up fairly evenly. Also use mattress stitch to firmly attach the handle to the other side of the purse.

Showing Front, Back, and Base/Side/Strap pieces.

Showing the inside of the bag, with yarn ends woven into the seam.

Take your zipper and pin it to the inside of the opening in the Front Piece, then sew it in place. You want to sew the edges of the opening about 1/4″ away from where the zipper opens, or whatever makes you feel comfortable that the yarn won’t get stuck in the zipper.

Turn the purse inside out. Take your 5″ by 4″ pocket and position it over the back of the zipper opening, with the purl side facing you (i.e. matches the rest of the purse interior). Using a long piece of yarn, stitch the pocket to the interior of the purse. I simply stitched back and forth through a purl-bump on a row, then into the pocket, through the purl-bump in the next row, and so on (hope that makes sense).

On the front flap, take two double-pointed needles and pick up 2-3 stitches on the outer-corner. Knit for i-cord about 1 inch long, then secure as a loop back onto the spot you started from. The size of your loop will depend on what buttons you want to use. Repeat for opposite outer-corner. Pull the flap closed and, looking at where the loops fall, estimate where on the Front Piece you will want your buttons, then attach them. I also added a second set of buttons for the flap to close with when the bag is more full. You can test this by putting some things in it and seeing how it closes.

Securely weave in all yarn ends.

Now, keep in mind what I said about the last 24 rows of the Back Piece. I made a separate piece by working those 24 rows again and attached it using mattress stitch to the inner side of the flap. This was because my closing flap would not lay flat when knit in stockinette stitch (beginner’s error).

Optional lining:

I sewed a lining into the bag because I did not want items to poke through the knitting. The gauge of this purse is not very tight, so a lining is nice to protect your work. I do not claim to be good at sewing, so I apologize if my instructions for this part are kind of vague.

Pick your fabric and matching thread. Measure and pin the fabric into a pocket shape that will fit comfortably down into the purse. Stitch the sides of the pocket (if necessary). Now that you have your pocket, stuff it down into the purse and pin the top edge along the top opening of the purse. Sew securely along the top opening (again, as for the zipper pocket, I recommend sewing each stitch of thread into a purl bump on the inside of the purse as you go).

This pattern © Kristin Lewallen (Arafly)
For questions/info contact thatcatinblack@gmail.com

Figuring where to add the i-cord loops and attach the buttons.

Showing the finished zipper pocket, from the outside.

Showing the inside of the bag after sewing in the lining.

It can be done.

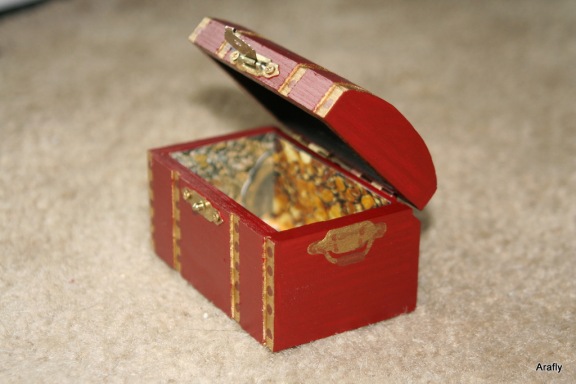
It is recommended not to use pictures printed off of an ink jet printer when you are decoupaging. I had an experience with this before I was aware that it was a bad idea, in which the photo I coated turned all kinds of funny colors as the glue sucked the ink out of the paper.

Being that I am stubborn and do not have as many magazines as I would like to sort through, I found a way around it. Besides, what magazines would I need to have to obtain lots of pictures of gold and treasure? Some of you probably already tried this, but simply spraying your printed photos with 4 coats or so of acrylic sealant solved the run problem. I was worried at first that I may not have sprayed it evenly enough, but it turned out just fine.

It was a very simple project I was working on, but I will definitely need to use a different kind of glue to fix the paper onto the inside of the chest if I do it again. It had a hard time staying flat as it dried.

To start things off

I suppose it would only be appropriate to make my first blog post about a crafting success.

This year I had the honor of donating a knitted Doctor Who (Tom Baker) scarf to Desert Bus, a gaming marathon charity, with all proceeds going to Child’s Play Charity. The good folks at Desert Bus put my scarf up for a live auction on November 19th/20th, which even at the odd hour of 3:30 am PST, sold for $3,339.00! I pretty much fell out of my chair.

Here is a photo:

The Desert Bus for Hope crew displays my Doctor Who scarf.